How to Enter Timesheets and Submit for Approval
The OfficeSeries application offers a comprehensive solution for managing timesheets, allowing users to accurately track their work hours on a daily or weekly basis. This guide will walk you through the process of entering timesheet hours, saving drafts, and submitting timesheets for approval.
Prerequisites
Before proceeding with viewing and editing your timesheets, ensure you have the necessary permissions, assigned license, login credentials (username/email and password), internet access, browser capability, and access rights.
Assigned License: Ensure that your account been assigned a valid OfficeSeries license. This license grants you access to the timesheet features within the application. If you do not have a license, contact your administrator to obtain one.
When to use this guide
If you are a user who needs to enter your work hours, track project time, and submit timesheets for approval, this guide is for you.
How to Enter Timesheets in OfficeSeries
A weekly grid view is designed for timesheet entry screens to provide a clear and organized layout for logging your work hours. Each row represents a different project, and each column corresponds to a specific date within the selected week. This structure allows you to easily track and input your hours for multiple projects across the entire week. This section provides a concise, step-by-step process for entering and submitting timesheets in the OfficeSeries application.
Step 1: Go to timesheet entry page
- Log in to the OfficeSeries application.
- Navigate to the "Timesheet" section from the main menu.
- Within the My Timesheet dashboard, click on "Timesheet Entry" card.
- Select the "Enter Timesheet" button to access the timesheet entry grid.
Step 2: Enter Timesheet Data
In OfficeSeries, you will enter your timesheet data using a weekly grid view. Each row in this grid represents a different project, while each column corresponds to a specific date within the selected week. This layout allows you to easily track and input your hours for multiple projects across the week. You can navigate between weeks using the provided buttons to ensure accurate data entry. The weekly grid view streamlines logging hours, saving drafts, and submitting timesheets for approval, making your time tracking efficient and precise.
Navigate to the correct week
Before starting time entry, make sure that you're entering time on the correct week. Use the "Previous week's timesheet" and "Next week's timesheet" buttons to move to the desired week.

Another way to go to a specific week is by clicking the top menu's "View or Edit Timesheets". Then you can select the desired week to view or edit.

The edit link will show if the timesheet is editable and unlocked; however, if the timesheet is waiting for approval or approved, the view link will be shown. This ensures that you can only edit the timesheet when it is unlocked for data accuracy.
Select the project
Choose the project worked on during the selected time period using the "Add Project" dropdown. If you have multiple projects, you can select all relevant projects from the list. If you need to remove a project from the Timesheet Entry, you can simply click the delete icon beside the total hours.
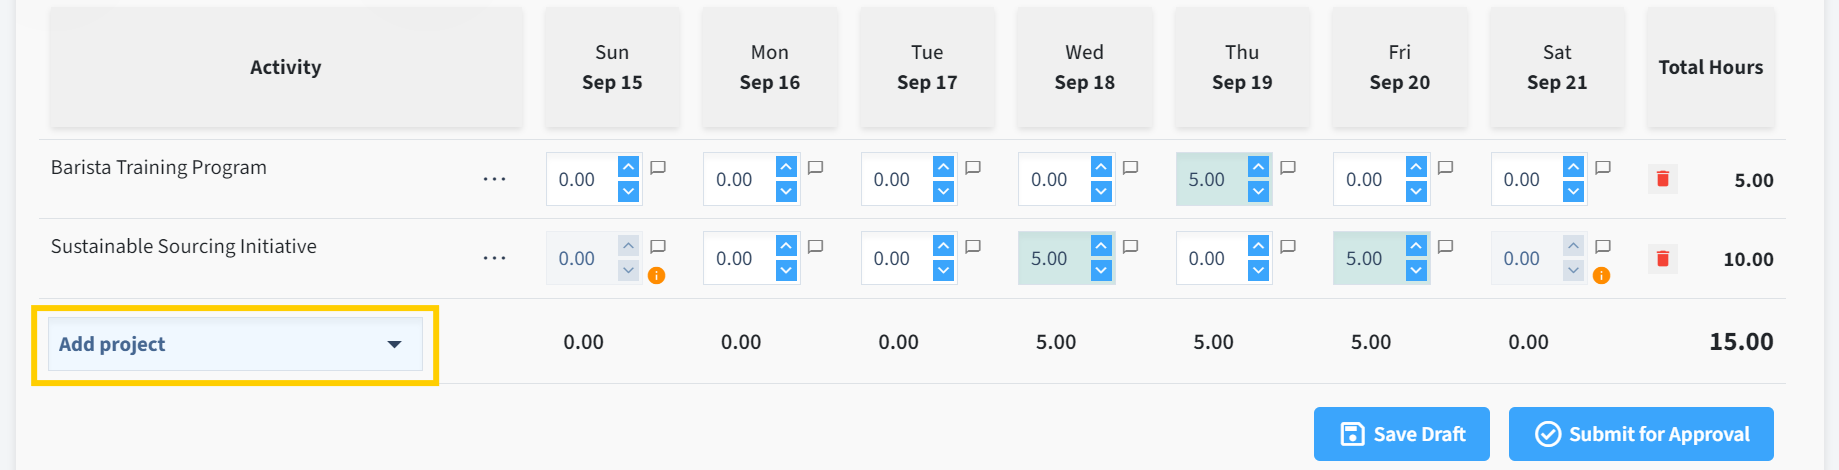
Note: If no projects appear in the "Add Project" dropdown, you haven't been allocated any projects for the selected week. If the project you're working on isn't listed, you may not have access to it. Please contact your project manager or administrator to update your project allocations.
Enter hours
Input the number of hours worked in the corresponding field for each day, or you may use the up/down buttons to adjust the hours for each project per day.
Optionally, add any relevant notes to the entry to provide additional context by clicking on the "note" icon beside the hours field.

Note: You can only enter hours for dates covered by your project allocation. For example, in the image above, the project allocation ends on September 27, which means you can only log hours up to that date. The info icon (located right below the note icon as highlighted above) will indicate days without allocation, showing "No hours are allocated for this day" when hovered over.
Step 3: Save your timesheet
After entering your hours, click the "Save Draft" button to save your progress. This allows you to securely save the entered information without submitting it for approval, enabling you to make any necessary changes later.
Step 4: Submit your timesheet for approval
- Once you have completed your week's timesheet and are ready to submit it for approval, click the "Submit for Approval" button. This action finalizes your timesheet for the period and sends it to your manager or the designated approver for review.
- Note that once submitted, you will not be able to make further edits unless the timesheet is returned to you for corrections.
- When you submit your timesheet for approval, the system will automatically create entries for any days where you have recorded zero hours.
- This is to confirm that you did not work on those days and to prevent you from accidentally adding time to past days, like weekends.
- These zero-hour entries are only generated when you request approval for a weekly timesheet.
- This helps ensure that your timesheet is accurate and complete.
For more details about understanding the OfficeSeries approval workflow, refer to Timesheet Approval Process.
Step 5: View, edit, and manage submitted timesheets
- To view, edit, or manage your submitted timesheets, navigate back to the "My Timesheet" section.
- Locate the "View or Edit Timesheet" card. This is where you can access previously submitted timesheets.
- From here, you can check the status of your submitted timesheets, including whether they have been approved, rejected, or are still pending approval.
- This section also allows you to edit timesheets that have been returned for corrections.
For more detailed instructions on viewing and managing your timesheets, refer to the View and Manage Timesheets guide.
Summary
Managing timesheets in the OfficeSeries application is a straightforward process that ensures accurate tracking of work hours. By following the steps outlined in this guide, you can efficiently enter, save, and submit your timesheets for approval.
If you encounter any issues or need further assistance, consider reaching out to OfficeSeries support for help.